ブートログを調べる
dmesgコマンドで出力できます。
# dmesg
Linux version 2.6.18-194.26.1.el5 (mockbuild@builder10.centos.org) (gcc version 4.1.2 20080704 (Red Hat 4.1.2-48)) #1 SMP Tue Nov 9 12:54:20 EST 2010
Command line: ro root=LABEL=/ console=tty0 console=ttyS0,115200n8r
BIOS-provided physical RAM map:
BIOS-e820: 0000000000010000 - 000000000009f400 (usable)
BIOS-e820: 000000000009f400 - 00000000000a0000 (reserved)
BIOS-e820: 00000000000f0000 - 0000000000100000 (reserved)
BIOS-e820: 0000000000100000 - 000000001fffd000 (usable)
BIOS-e820: 000000001fffd000 - 0000000020000000 (reserved)
BIOS-e820: 00000000fffbc000 - 0000000100000000 (reserved)
DMI 2.4 present.
kvm-clock: cpu 0, msr 7eff:8043c401, boot clock
ACPI: RSDP (v000 BOCHS ) @ 0x00000000000fd730
(省略)
dmesgコマンドのmanページに、用途が書いてあります。
DESCRIPTION
dmesg is used to examine or control the kernel ring buffer.
The program helps users to print out their bootup messages.
Instead of copying the messages by hand, the user need only:dmesg > boot.messages
and mail the boot.messages file to whoever can debug their problem.
障害などで困ったら、dmesgで出力した内容を、Linuxに詳しい人に送るということですね。
Sakura VPS 512 でシリアルコンソール接続を可能にしている設定を調べる
SakuraのVPSは、「バーチャル」なサーバーですから、契約者は物理サーバーに触れることができません。そのため、デフォルトでリモートコンソールが用意されていて、Webブラウザからアクセスできるようになっています。
この「リモートコンソール」こそが、物理サーバーのCOMポートに接続して利用するシリアルコンソールの代用というわけです。
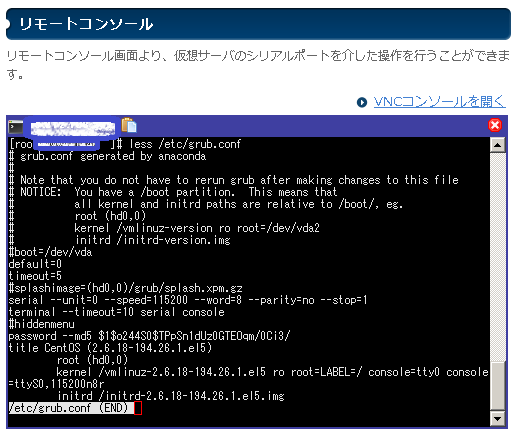
シリアルコンソール接続するための設定を見ておきましょう。
※設定を変更すると、リモートコンソールが利用できなくなることがあります。ご注意ください。
/etc/grub.conf(抜粋)
serial --unit=0 --speed=115200 --word=8 --parity=no --stop=1
terminal --timeout=10 serial console
ここでは、GRUBにメッセージをシリアルコンソールに流すよう指示しています。
kernel /vmlinuz-2.6.18-194.26.1.el5 ro root=LABEL=/ console=tty0 console=ttyS0,115200n8r
「ttyS0」はシリアルコンソールのことを意味します。カーネルの各インスタンスに渡すようなのですが、何をやっているかは分かりません。
/etc/inittab(抜粋)
#serial
co:12345:respawn:/sbin/agetty -h 115200 ttyS0 vt100
ここでは、シリアルコンソールからのログインをlistenするよう指示しています。
尚、agettyコマンドの引数の意味は、115200 = ボーレート / ttyS0 = シリアルデバイス / vt110 = 端末の名称、となります。
最後に、CentOSのデフォルトのインストールでは、シリアルデバイスからrootユーザーでログインすることができないそうで、そのため以下が「ttyS0」が追記されています。
/etc/securetty
console
vc/1
(省略)
vc/11
tty1
(省略)
tty11
ttyS0
ホスト名の参照と変更方法
ホスト名の調べ方は以下の通りです。
[suzuki@test_server suzuki]$ hostname
test_server
ホスト名の変更方法は以下の通りです。
[root@test_server root]# hostname new_name
再ログインすると。
[root@new_name root]#
GRUBにパスワードを設定して、シングルユーザーモードでの起動を制限する
Linuxをシングルユーザーモードで起動すると、パスワードを入力しなくてもroot権限で動作します。
それでは危険なので、GRUBでシングルユーザーモードに変更する時点で、パスワードを要求するように設定します。
<<事前準備>>
パスワードをMD5で暗号化する。
# grub-md5-crypt
Password: ***
Retype password: ***
$1$rpC4S0$HjOnlwM/GgQghyDH0PlyX.
パスワードを、/boot/grub/grub.conf に書き込む。
また、起動時にGRUB画面で停止させるため、timeout=-1 に変更し、hiddenmenu をコメントアウトします。
# grub.conf generated by anaconda
#
# Note that you do not have to rerun grub after making changes to this file
# NOTICE: You have a /boot partition. This means that
# all kernel and initrd paths are relative to /boot/, eg.
# root (hd0,0)
# kernel /vmlinuz-version ro root=/dev/vda2
# initrd /initrd-version.img
#boot=/dev/vda
default=0
timeout=-1
#splashimage=(hd0,0)/grub/splash.xpm.gz
serial --unit=0 --speed=115200 --word=8 --parity=no --stop=1
terminal --timeout=10 serial console
#hiddenmenu
password --md5 $1$rpC4S0$HjOnlwM/GgQghyDH0PlyX.
title CentOS (2.6.18-194.26.1.el5)
root (hd0,0)
kernel /vmlinuz-2.6.18-194.26.1.el5 ro root=LABEL=/ console=tty0 console
=ttyS0,115200n8r
initrd /initrd-2.6.18-194.26.1.el5.img
<<シングルユーザーモードでの起動>>
サーバーを再起動します。
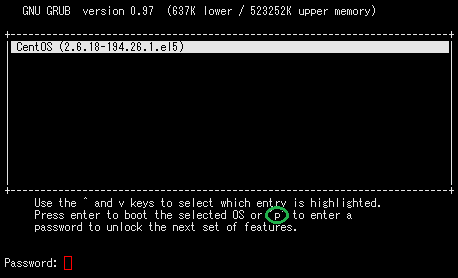
p を入力後、パスワードを入力します。
a を入力します。
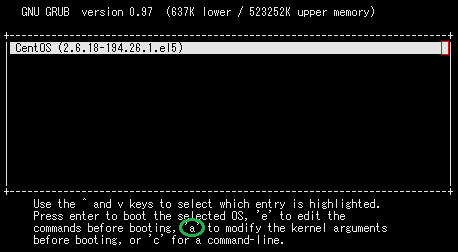
single と入力し、[Enter]を押下します。
[ Minimal BASH-like line editing is supported. For the first word, TAB
lists possible command completions. Anywhere else TAB lists the possible
completions of a device/filename. ESC at any time cancels. ENTER
at any time accepts your changes.]
grub append> ro root=LABEL=/ single console=tty0 console=ttyS0,115200n8r
シングルユーザーモードで立ち上がります。
パスワードを入力しなくても、root権限でログインされています。
sh-3.2#
infoマニュアルの読み方
infoコマンドは、GNUプロジェクトで開発されたツールのマニュアルを読むのに用います。
manコマンドでもマニュアルは読めますが、簡易なものにとどまっていることがあるようです。例えば、grubコマンドをmanで調べると、末尾にinfoマニュアルを参照するように書かれています。
SEE ALSO
The full documentation for grub is maintained as a Texinfo manual.
If the info and grub programs are properly installed at your site,
the commandinfo grub
should give you access to the complete manual.
infoコマンドの実行はいたって簡単です。以下では、grubコマンドのマニュアルを参照しています。
$ info grub
すると以下の通りに表示されます。例えば、"Introduction"を読みたいのであれば、[↑]と[↓]を使ってカーソルを移動させ、望みのメニュー上で[Enter]を押せば画面が移動します。
File: grub.info, Node: Top, Next: Introduction, Up: (dir)
GRUB manual
***********This is the documentation of GNU GRUB, the GRand Unified Bootloader, a
flexible and powerful boot loader program for PCs.This edition documents version 0.97.
* Menu:
* Introduction:: Capturing the spirit of GRUB
* Naming convention:: Names of your drives in GRUB
* Installation:: Installing GRUB on your drive
* Booting:: How to boot different operating systems
* Configuration:: Writing your own configuration file
* Network:: Downloading OS images from a network
* Serial terminal:: Using GRUB via a serial line
* Preset Menu:: Embedding a configuration file into GRUB
* Security:: Improving the security
* Images:: GRUB image files
* Filesystem:: Filesystem syntax and semantics
* Interface:: The menu and the command-line
* Commands:: The list of available builtin commands
* Troubleshooting:: Error messages produced by GRUB
* Invoking the grub shell:: How to use the grub shell
* Invoking grub-install:: How to use the GRUB installer
* Invoking grub-md5-crypt:: How to generate a cryptic password
* Invoking grub-terminfo:: How to generate a terminfo command
* Invoking grub-set-default:: How to set a default boot entry
* Invoking mbchk:: How to use the Multiboot checker
* Obtaining and Building GRUB:: How to obtain and build GRUB
* Reporting bugs:: Where you should send a bug report
* Future:: Some future plans on GRUB
* Internals:: Hacking GRUB
* Index::
info画面の操作方法は以下の通りです。
- M:メニュー画面に移動する。
- L:1画面戻る。
- D:先頭のdirページに戻る。
- ?:用法を表示します。
- Q:infoを終了する。
キーアサインの調べ方
例えば以下の太字箇所は、実行中のコマンドの停止は(interrupt)、[Ctrl] + C で行うことを意味します。
$ stty -a
speed 38400 baud; rows 58; columns 107; line = 0;
intr = ^C; quit = ^\; erase = ^?; kill = ^U; eof = ^D; eol =; eol2 = ; swtch = ;
start = ^Q; stop = ^S; susp = ^Z; rprnt = ^R; werase = ^W; lnext = ^V; flush = ^O; min = 1; time = 0;
-parenb -parodd cs8 -hupcl -cstopb cread -clocal -crtscts -cdtrdsr
-ignbrk -brkint -ignpar -parmrk -inpck -istrip -inlcr -igncr icrnl ixon -ixoff -iuclc -ixany -imaxbel -iutf8
opost -olcuc -ocrnl onlcr -onocr -onlret -ofill -ofdel nl0 cr0 tab0 bs0 vt0 ff0
isig icanon iexten echo echoe echok -echonl -noflsh -xcase -tostop -echoprt echoctl echoke
